How to Password Protect an External Hard Drive

How to Password Protect
Protecting your external hard drive with a password is one of the best ways to keep your data safe. Whether you're storing personal files, business documents, or backups, encryption ensures that only authorised users can access your information.
When you set up a password for your drive, you’re not only locking it—you’re also encrypting the data. Encryption scrambles your files into an unreadable format that can only be unlocked with the correct password. This means that even if someone gains physical access to your drive, they won’t be able to read its contents without your password.
The key to doing this right is following a logical, step-by-step process. This guide will walk you through exactly how to password protect an external hard drive on both Windows and Mac the right way.
We recommend you begin with a new or factory reset external drive that is empty, or risk losing any data already stored on the device.
Step 1: Encrypt Your External Hard Drive
Before you start moving files, the first step is to encrypt your external hard drive. Encrypting the drive ensures that everything stored on it is automatically protected with a password, making it unreadable without proper authentication. The process is different for Windows and Mac operating systems.
Encrypting an External Hard Drive on Windows
Windows users can use BitLocker, a built-in encryption tool, but keep in mind that it’s only available on Windows Pro and Enterprise editions. If you’re using Windows Home, you’ll need a third-party tool like VeraCrypt or Cryptomator instead.


- Plug in your external hard drive and open File Explorer.
- Right-click the drive and select Turn on BitLocker.
- Choose Use a password to unlock the drive and enter a strong password.
- Save your password in at least one secure location—you can store it in your Microsoft account, on a USB drive, or print it out.
- Select Encrypt entire drive for the best security.
- Click Start Encrypting and wait for the process to finish.
Cryptomator is an excellent open-source option that works on Windows, Mac, Linux, iOS, and Android. Unlike some encryption tools, it lets you encrypt files on an existing drive without needing to erase anything.
Encrypting an External Hard Drive on Mac
Mac users have built-in encryption as well, and newer Macs especially benefit from using APFS, which is optimised for SSDs.
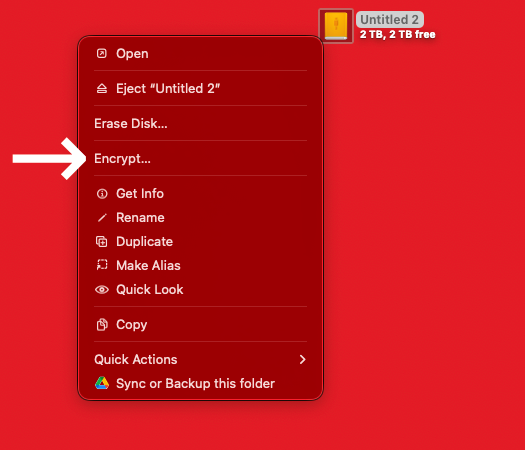
- Plug in your external hard drive and open Finder.
- Right-click the drive and select Encrypt “Drive Name”.
- Enter a strong password and add a password hint if needed.
- Store your recovery key somewhere safe, like a password manager or an external USB drive.
- Wait for the encryption process to complete.
If your drive isn’t formatted as APFS or Mac OS Extended (Journaled, Encrypted), you may need to reformat it first using Disk Utility before enabling encryption. As a reminder, we recommend that all of the steps in this article be performed on a new or empty drive.
If you reformat with Disk Utility on a drive that holds data, you will lose your data.
Alternative: Using a Secure Disk Image Instead of Full-Disk Encryption
If you don’t want to encrypt your entire external drive but still need a password-protected space for sensitive files, macOS offers another built-in option—creating a secure disk image using Disk Utility.
This method allows you to create an encrypted folder-like container on your external drive, where you can store files securely while leaving the rest of the drive unencrypted.


To set it up:
- Open Disk Utility on your Mac.
- Click File > New Image > Blank Image.
- Choose a location on your external drive to store the disk image.
- Select a name and size for your secure container.
- Under Encryption, choose 128-bit AES encryption for a balance of security and speed.
- Enter a strong password when prompted.
- Click Save, and wait for the secure disk image to be created.
Once set up, you can mount the encrypted image like a regular folder, and macOS will require a password to access its contents. This is a great option if you need to store confidential files securely but also want to keep part of your external drive unencrypted for general use.
Step 2: Back Up Your Recovery Key
Once your external hard drive is encrypted, your password is the only way to access it. If you lose that password and the recovery key, your data is gone forever. That’s why it’s crucial to back up your recovery key in at least one secure location—ideally two.
A good strategy is to store the key in a password manager like 1Password, on a USB drive, or even as a printed copy in a locked safe. Whatever you do, don’t keep it in the same place as your external drive.
Step 3: Start Using Your Encrypted External Drive
Once your external hard drive is encrypted, you can start storing files securely. Any new data you save will be automatically protected by encryption.
From time to time, it’s a good idea to open a few files to make sure they are still accessible and working correctly. While encryption is reliable, occasional verification ensures there are no issues with file corruption or drive health.
Every time you connect the drive, you’ll need to enter your password to access your data. As long as you remember your password and keep your recovery key safe, your files will remain secure and accessible.
The Importance of the 3-2-1 Backup Strategy
Encrypting your external hard drive is a great step toward protecting your data, but it shouldn’t be your only safeguard. Hardware failures, accidental deletions, or unforeseen disasters can still put your files at risk. That’s where the 3-2-1 backup strategy comes in.
The 3-2-1 rule ensures your data is safe and recoverable by following these guidelines:
By following this strategy, you reduce the risk of total data loss. If your encrypted external drive fails, you’ll still have another copy available.
Final Thoughts
Learning how to password protect an external hard drive is an essential step in keeping your personal or business data safe. Once encryption is set up, every file you store on the drive will be automatically protected, ensuring your files remain protected against unauthorised access.
To keep your data safe long-term, remember to store your recovery key in a secure location and periodically check your files to make sure they remain accessible. For even better protection, follow the 3-2-1 backup strategy so you always have multiple copies of your important files.
If you ever run into data loss issues due to encryption errors, drive corruption, or accidental deletion, DriveSavers UK is here to help. Contact our English team based in Epsom and Basildon for professional data recovery solutions and get your files back quickly and safely.