Cómo funciona la recuperación de datos
Cuando una unidad o dispositivo falla y datos importantes desaparecen de repente, puede sentirse como si todo se detuviera. En un laboratorio profesional de recuperación de datos como DriveSavers Data Recovery, los ingenieros siguen un proceso probado para recuperar esa información.
Desde 1985, DriveSavers ha recuperado datos de prácticamente cualquier tipo de dispositivo que almacene información digital, incluidos discos duros, SSD, teléfonos inteligentes, tabletas, memorias USB, tarjetas de memoria para cámaras y sistemas RAID y NAS de múltiples discos.
Este artículo abre las puertas del laboratorio y recorre el proceso paso a paso, comenzando con la recepción inicial y explicando cómo los ingenieros evalúan un dispositivo, protegen el medio original, crean una imagen o clon especializado y reconstruyen datos a los que su ordenador o dispositivo ya no puede acceder. El mismo enfoque general se aplica a muchos tipos de medios, con técnicas específicas adaptadas a cada tecnología.
Si desea primero una visión general, lea el artículo complementario “¿Qué es la recuperación de datos?”, y luego vuelva aquí para conocer con más detalle cómo funciona la recuperación de datos dentro del laboratorio profesional de DriveSavers.
El proceso de DriveSavers
Los asesores de recuperación de datos recopilan información inicial
El proceso de recuperación de datos comienza incluso antes de que su dispositivo llegue al laboratorio. Cuando contacta por primera vez con DriveSavers, un asesor recopila información clave: qué tipo de dispositivo tiene (disco duro, SSD, RAID o NAS, teléfono inteligente, tableta, memoria USB, tarjeta de cámara u otro medio de almacenamiento de datos), con qué plataforma se utilizaba (Mac, Windows, móvil o servidor) y qué detalles puede aportar sobre la situación de pérdida de datos.
You’ll be asked about symptoms such as drops, liquid spills, power events, unusual noises, error messages, or a volume suddenly going offline, along with any previous repair or recovery attempts. This initial conversation sets expectations and gives engineers a roadmap for the safest way to handle your case once the device arrives. The advisor will then provide a general estimate of cost and email you a service order confirmation along with a free shipping label for the DriveSavers lab.
Cuando el envío llega al laboratorio, el dispositivo se registra formalmente en el sistema. Se anotan el modelo y el número de serie, el hardware se vincula al expediente del caso y su estado se fotografía y documenta para poder seguirlo en cada etapa del proceso.
A continuación, los ingenieros realizan una inspección física para buscar indicios adicionales — señales de impactos, líquidos, manipulaciones u otros daños que anteriormente podrían no haber sido evidentes. Durante todo el proceso se siguen procedimientos de seguridad para garantizar que el dispositivo y los datos se gestionen de acuerdo con las certificaciones de seguridad del sector.
Encendido inicial y pruebas seguras
Una vez que el dispositivo ha sido registrado e inspeccionado, los ingenieros realizan un encendido controlado. El dispositivo se conecta a sistemas de diagnóstico especializados que leen el medio sin modificarlo.
Aquí el enfoque está en el comportamiento bajo alimentación: ¿funciona el dispositivo de forma fiable? ¿Las herramientas lo detectan a bajo nivel de hardware, incluso si el ordenador no puede montar un volumen? ¿Existen tiempos de espera, códigos de error o fallos de lectura evidentes? En los discos duros mecánicos, los ingenieros también escuchan clics, ruidos de rozamiento o ciclos repetidos de arranque que indican problemas físicos.
Diferenciar problemas lógicos y físicos
Engineers separate logical problems from physical ones.
Los problemas lógicos incluyen cuestiones de organización, como un sistema de archivos dañado, una eliminación accidental, una partición eliminada o reformateada, o metadatos dañados que normalmente indican al sistema dónde se encuentran los archivos y carpetas. En estos casos, el hardware puede inicializarse con normalidad, pero las estructuras del medio de almacenamiento dejan de tener sentido para el sistema operativo.
Los problemas físicos afectan al hardware subyacente — fallos mecánicos o electrónicos, componentes dañados o conectores rotos. Los dispositivos que muestran un comportamiento inestable al encenderse se consideran en riesgo físico y se derivan a un proceso de recuperación centrado en el hardware. Aquellos que se inician correctamente y responden de forma estable se encaminan a flujos de recuperación lógica.
Qué puede esperar de la evaluación
Desde su perspectiva, la evaluación consiste en obtener información clara antes de decidir los siguientes pasos. Una vez completadas las pruebas iniciales, los ingenieros explican sus conclusiones en un lenguaje sencillo: qué tipo de problema han detectado, cómo afecta al acceso a los datos y si la recuperación parece viable.
Si la recuperación parece posible, analizaremos la situación con usted y le proporcionaremos una estimación del trabajo de recuperación, junto con una recomendación sobre los siguientes pasos. La recuperación de datos solo comienza una vez finalizada la evaluación y tras su aprobación para continuar, garantizando que pueda tomar una decisión informada antes de iniciar el proceso.
En este punto, los ingenieros ya saben cómo se comporta el dispositivo al encenderse. Este paso se aplica únicamente a dispositivos con daños físicos o inestabilidad. Si las pruebas demostraron que el hardware está en buen estado —lo que indica un fallo lógico como un sistema de archivos dañado o una partición eliminada— el dispositivo pasa directamente a la clonación en el Paso 5. Las herramientas de recuperación lógica se aplican al clon en el Paso 6, una vez finalizado el proceso de creación de la imagen.
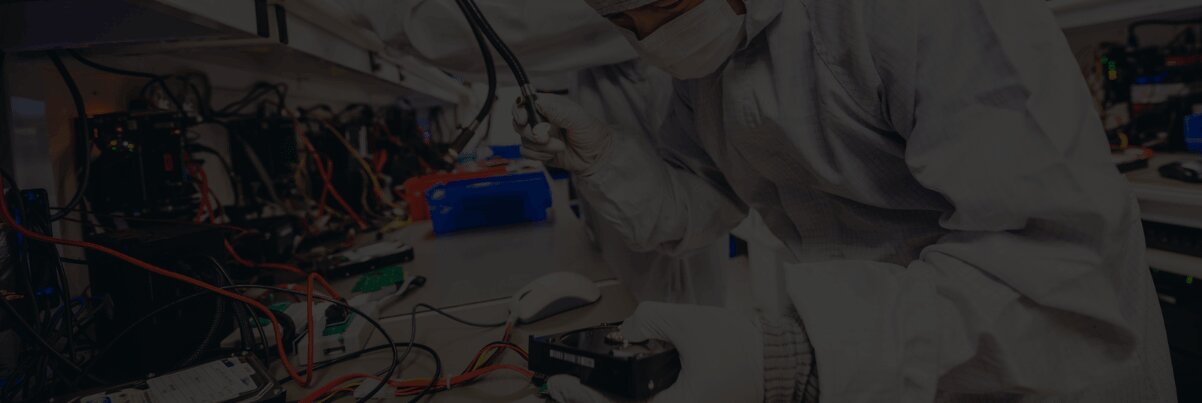
Ruta de recuperación física: estabilización del hardware dañado
Cuando las pruebas muestran signos claros de daño físico o inestabilidad, la prioridad es estabilizar el dispositivo el tiempo suficiente para crear una imagen o un clon. Dependiendo del dispositivo y del tipo de daño, esto puede implicar sustituir componentes internos defectuosos por piezas compatibles de nuestro inventario de más de 25.000 dispositivos, reparar la electrónica de la placa de circuito o arreglar conectores dañados para que el dispositivo se encienda correctamente y se comunique con las herramientas de nuestro laboratorio.
En el caso de smartphones, tabletas y sistemas integrados con data storage en placa, los ingenieros pueden necesitar realizar microsoldadura directamente en la placa para acceder a la memoria flash. En medios flash gravemente dañados, como memorias USB o tarjetas de cámara rotas, pueden retirar los chips de memoria y acceder a los datos en bruto. Estas reparaciones son temporales y están diseñadas específicamente para ofrecer a los ingenieros una ventana de tiempo en la que recuperar la mayor cantidad posible de datos legibles.
Cuando es necesario abrir un disco duro, el trabajo se realiza en una sala limpia estrictamente controlada. DriveSavers opera salas limpias certificadas ISO Clase 5 diseñadas para proteger los delicados componentes internos de la unidad frente a la contaminación microscópica que podría rayar los platos y destruir los datos. Los medios flash y los trabajos a nivel de placa, como la microsoldadura o los procedimientos chip-off, se llevan a cabo en estaciones electrónicas especializadas diseñadas para la precisión y la protección contra la electricidad estática. En ambos tipos de trabajo, DriveSavers utiliza diagnósticos avanzados, incluida tecnología térmica e imágenes de rayos X de alta resolución, para evaluar daños internos, confirmar fallos sospechados de componentes y respaldar procedimientos complejos como el retrabajo BGA (ball grid array) sin añadir estrés innecesario a medios frágiles.
Este tipo de recuperación física está reservado para dispositivos con daños reales de hardware o inestabilidad, y no para situaciones limitadas a la eliminación accidental u otros problemas exclusivamente de software.
Imagen sector por sector
El siguiente paso es crear un clon bit a bit. En lugar de copiar únicamente los archivos visibles, nuestros ingenieros realizan una copia sector por sector del medio, incluidas las particiones, las estructuras del sistema de archivos y las áreas que el sistema operativo ya no puede montar.
Una vez creada una imagen o clon fiable, el trabajo de recuperación se realiza sobre esa copia y no sobre el dispositivo original. El hardware dañado o inestable puede apagarse y conservarse mientras los ingenieros reconstruyen las estructuras y extraen los archivos a partir de la imagen.
Algunos proveedores todavía ejecutan herramientas de reparación directamente en la unidad o el dispositivo original. En DriveSavers, la creación de una imagen del dispositivo y el trabajo a partir de una copia son partes esenciales del proceso, lo que reduce el riesgo de causar daños adicionales a la fuente de datos original.
Gestión de áreas inestables o dañadas
No todos los dispositivos pueden leerse correctamente de principio a fin. Cuando el medio es inestable o está parcialmente dañado, las herramientas de imagen se utilizan con precaución. Los ingenieros suelen empezar por las áreas que se leen sin problemas y regresar después a las regiones más complejas, a veces realizando múltiples pasadas para recuperar la mayor cantidad posible de datos que el dispositivo todavía pueda ofrecer.
Durante la creación de la imagen, el software propietario registra los sectores ilegibles y los patrones de error recurrentes. Esta información ayuda al equipo a comprender qué partes del sistema de archivos o qué archivos podrían verse afectados más adelante. La creación de esta imagen puede llevar tiempo en un dispositivo dañado, pero proporciona una copia de trabajo segura de la que depende cada etapa del proceso de recuperación de datos.
Aplicación de herramientas de recuperación lógica al clon
En este punto, ambos caminos convergen. Tanto si el dispositivo presentaba daños físicos que requirieron estabilización en el Paso 4, como si contaba con hardware en buen estado pero con un fallo lógico que pasó directamente a la clonación, ahora se aplican las mismas herramientas de recuperación lógica al clon. El dispositivo original ya no se vuelve a encender — todo el trabajo a partir de aquí se realiza sobre la imagen.
Los problemas lógicos que se abordan habitualmente en esta etapa incluyen sistemas de archivos corruptos, particiones eliminadas o reformateadas y metadatos dañados —los registros internos que asignan archivos y carpetas a sus ubicaciones en el medio. Mediante herramientas especializadas de recuperación de datos, los ingenieros analizan estas estructuras a bajo nivel. Pueden ver cómo están organizadas las particiones, cómo se enlazan los registros de directorio y dónde deberían encontrarse los componentes clave del sistema de archivos, incluso cuando el sistema operativo ya no puede montar el volumen. Ese análisis guía el trabajo de reconstrucción descrito a continuación.
Reconstrucción de sistemas de archivos y particiones
Una vez que se dispone de una imagen o clon sólido, el trabajo pasa de “¿podemos leer el medio?” a “¿podemos interpretarlo?”. Los ingenieros utilizan la estructura en bruto de la imagen para reconstruir las estructuras de las que el sistema operativo suele depender en segundo plano.
Con herramientas especializadas reconstruimos las tablas de particiones, reparamos o reconstruimos estructuras de sistemas de archivos dañadas y localizamos directorios y registros de archivos perdidos que el dispositivo ya no muestra. En lugar de depender de un montaje estándar, los ingenieros trabajan directamente con estructuras de bajo nivel —patrones, firmas y metadatos restantes— para reconstruir cómo estaban organizados los volúmenes y las carpetas, lo que permite acceder a los archivos y recuperarlos de forma ordenada.
Gestión de configuraciones de almacenamiento complejas (p. ej., RAID, multidisco)
En sistemas de múltiples discos, como muchos arreglos RAID y algunos dispositivos NAS, existe una capa adicional de trabajo antes de poder analizar los sistemas de archivos. Es posible que los ingenieros deban reconstruir virtualmente la configuración RAID para determinar cómo funcionan juntos los discos, en qué orden y cómo se han distribuido (striping) o reflejado (mirroring) los datos entre ellos.
Una vez que la configuración virtual vuelve a comportarse como un único volumen, los ingenieros pueden examinar particiones, sistemas de archivos y directorios en la imagen virtual reconstruida como en cualquier otro caso, y después reconstruir virtualmente el sistema de archivos para extraer los datos almacenados.
Verificación de la integridad y la usabilidad de los archivos
Antes de devolver los resultados, los ingenieros no solo revisan cuántos archivos se han copiado, sino también si esos archivos son utilizables. Realizan comprobaciones por muestreo de ejemplos representativos de tipos de datos importantes —documentos, fotos, vídeos, bases de datos, máquinas virtuales y otros archivos críticos— para confirmar que se abren y funcionan como se espera.
Cuando procede, las comprobaciones automatizadas ayudan a detectar corrupción evidente o datos incompletos, pero la revisión humana sigue siendo una parte importante del control de calidad. Ningún laboratorio puede garantizar que cada archivo sea recuperable en todas las situaciones; el estado del medio original marca los límites. Nuestro objetivo es recuperar la mayor cantidad posible de datos utilizables que el dispositivo permita y organizarlos de forma clara, idealmente en su estructura original en el nuevo destino, para que puedan volver a utilizarse.
Copia de datos a un nuevo destino en buen estado
Una vez que los ingenieros han verificado los archivos y se puede acceder a ellos de forma fiable desde la imagen o el volumen reconstruido, extraen los datos recuperados a un nuevo medio — normalmente una unidad externa o una memoria USB.
El dispositivo original dañado, ya sea un disco duro, SSD, miembro de RAID o dispositivo móvil, no se considera seguro para el uso diario tras una recuperación. Se devuelve en su estado original inestable o parcialmente dañado. El nuevo dispositivo de destino proporciona una transferencia limpia de los datos recuperados, para que ya no tenga que depender del hardware dañado.
Cifrado y envío de los resultados
El paso final consiste en devolver los datos de forma segura. Los datos recuperados, junto con el dispositivo original, se envían de vuelta. Si la recuperación contiene datos sensibles que requieren cifrado, los datos se devolverán cifrados.
Con el envío, recibirá instrucciones claras sobre cómo restaurar los datos recuperados en un dispositivo en funcionamiento. Recomendamos encarecidamente utilizar el dispositivo de destino como copia secundaria y no como su única ubicación de trabajo.
Almacenamiento temporal y eliminación segura en el laboratorio
Después del proceso de recuperación, se almacena una copia de trabajo de los datos en un entorno estrictamente controlado y auditado, diseñado para proteger la información sensible. Una vez que los resultados han sido devueltos al propietario y ha transcurrido un plazo mínimo de 14 días —lo que permite verificar los datos y resolver cualquier problema de acceso— la copia de trabajo se elimina de forma segura como parte de los procedimientos estándar de seguridad.
Planificar el futuro
Después de una recuperación exitosa, muchas personas consideran la experiencia como un punto de inflexión. Los usuarios domésticos suelen reforzar sus hábitos de copia de seguridad, y las empresas pueden revisar sus políticas internas sobre copia de seguridad, retención y pruebas de sistemas críticos.
Para obtener una guía más detallada sobre cómo crear un plan de protección a largo plazo —como utilizar múltiples copias en distintos medios y ubicaciones— lea «Mejores soluciones y prácticas de copia de seguridad de datos».
Cuando la recuperación no es posible (y por qué)
Irreversibles Situaciones
Incluso con herramientas profesionales, algunas situaciones quedan fuera del alcance de la recuperación. Una de ellas es cuando los datos han sido sobrescritos o eliminados de forma segura: una vez que nueva información reemplaza a la anterior a bajo nivel, el contenido original ya no está presente y no puede recuperarse.
La recuperación también puede ser imposible tras daños físicos extremos en el propio dispositivo de data storage, como platos destrozados o chips flash quemados o físicamente destruidos. En algunos casos, el cifrado sin credenciales válidas establece un límite definitivo: si las claves o los métodos de acceso se han perdido y no existe otra vía, los datos pueden permanecer bloqueados.
Estos escenarios son la excepción, no la regla. En casos difíciles o poco claros, una evaluación profesional suele ser la forma más segura de determinar si la recuperación es realista o si el daño ha cruzado esa línea irreversible.
Cómo los intentos previos pueden afectar al resultado
Lo que sucede antes de que un dispositivo llegue al laboratorio puede influir de forma decisiva en el resultado. Los intentos repetidos de reparación o recuperación por cuenta propia —dejar que un disco duro que hace clic siga girando, sustituir piezas sin los controles adecuados, ejecutar software en un SSD defectuoso o reconstruir un RAID dañado mediante prueba y error— pueden destruir zonas que aún eran legibles y sobrescribir fragmentos que de otro modo podrían haberse recuperado.
Estos intentos también pueden complicar el diagnóstico al ocultar la avería original y añadir nuevos problemas. Cuando los ingenieros de DriveSavers examinan el dispositivo, pueden tener que desentrañar tanto el daño inicial como los efectos secundarios de intentos anteriores, lo que puede dificultar una recuperación satisfactoria.
Próximos pasos
Una vez que tu disco duro externo esté cifrado, podrás empezar a guardar archivos de forma segura. Cualquier dato nuevo que guardes estará automáticamente protegido mediante cifrado.
De vez en cuando, es recomendable abrir algunos archivos para comprobar que siguen siendo accesibles y funcionan correctamente. Aunque el cifrado es fiable, una verificación ocasional ayuda a evitar problemas de corrupción o fallos en la unidad.
Cada vez que conectes la unidad, deberás introducir tu contraseña para acceder a tus datos. Mientras recuerdes tu contraseña y mantengas segura tu clave de recuperación, tus archivos seguirán protegidos y accesibles.
Si se enfrenta a una situación activa de pérdida de datos y no quiere arriesgarse a empeorarla, póngase en contacto con un líder mundial de confianza en recuperación profesional de datos, DriveSavers 24/7, para una evaluación y ayuda especializada con su dispositivo y situación concreta llamando al 1 (800) 440-1904.